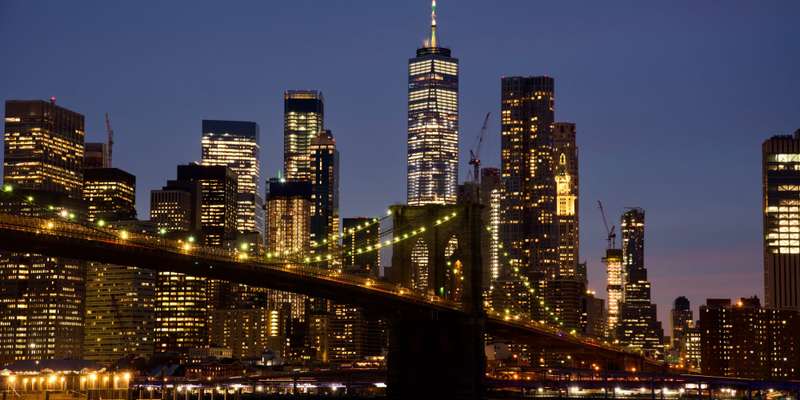
Capturing the Brooklyn Bridge at dawn should be a magical experience, yet most visitors end up with mediocre shots amid frustrating crowds. Over 4 million pedestrians cross annually, with sunrise being the most congested photography window. The challenge isn't just technical – it's finding those precious minutes when golden light hits the cables without battling selfie sticks or hurried commuters. Professional photographers know the hidden truth: the iconic 'empty bridge' shots require precise timing, unconventional angles, and local knowledge about Manhattan's changing light patterns. Whether you're using a smartphone or DSLR, the difference between a postcard-worthy image and another blurry snapshot comes down to understanding three often-overlooked factors most travel guides never mention.
Why your golden hour shots keep failing (and how to fix it)
The Brooklyn Bridge's east-west orientation creates deceptive lighting challenges most photographers don't anticipate. That 'perfect golden glow' actually occurs 23 minutes earlier than Manhattan's official sunrise time due to the bridge's elevation and surrounding skyscrapers. Local photographers set up 45 minutes before dawn to catch the first pink hues reflecting off the East River – a window that lasts only 6-8 minutes before harsh shadows appear. The secret lies in positioning yourself on the Manhattan side pedestrian walkway near pillar 3, where the morning light slices perfectly between cables. Bring a graduated ND filter to balance the bright skyline with darker foreground elements. For smartphone users, tap-and-hold to lock exposure on the bridge towers, then slide down to underexpose slightly for richer colors.
UPDATES FOR YEAR 2026
Current Access Rules and New Logistics for Morning Shoots
Navigating the bridge has changed significantly following the completion of major infrastructure projects and the implementation of new city ordinances. The main pedestrian promenade is now entirely free of bicycle traffic, as all cyclists have been relocated to a dedicated lane on the lower roadway; this provides much more stability and space for tripod setups. For those driving to the site, be prepared for the active Congestion Relief Zone tolls when entering Lower Manhattan. Additionally, the city has strictly codified drone regulations, requiring a mandatory NYPD permit with a 30-day lead time for any aerial photography, and bridge security has been heightened to protect the newly restored granite towers and LED lighting systems.
Two hidden vantage points even New Yorkers miss
While everyone crowds the bridge walkway, savvy shooters capture unique perspectives from these nearby spots: The underrated Washington Street Waterfront (just south of the bridge) offers a jaw-dropping alignment where morning sun illuminates both the bridge and Manhattan Bridge arches. Arrive by 5:15 AM to claim the small pier extending into the river. For elevated shots, the DUMBO parking garage on Anchorage Place opens its rooftop at 5:30 AM – the only legal high vantage point without needing drone permits. Its northwest corner frames the bridge with the sunrise behind it, creating stunning silhouette opportunities. Both locations require walking through less-touristed areas pre-dawn, so use Google Maps' offline mode as cell service can be spotty near the water.
Camera settings that pros actually use at dawn
Contrary to popular advice, 'auto sunrise' modes often overexpose the Brooklyn Bridge's intricate cable details. Start with these manual settings: For DSLRs, try f/8 aperture, 1/125 shutter speed, and ISO 400 as your baseline – the bridge's movement requires faster shutters than typical landscapes. Mirrorless users should enable zebra stripes at 70% to avoid blowing out highlights on the towers. The real game-changer is setting white balance to 5500K instead of auto; this preserves the warm tones without making the sky unnaturally orange. Smart photographers bracket three shots (underexposed by 1 stop, normal, over by 1) to blend later, as the dynamic range exceeds what cameras can capture in one frame. Don't waste dawn's fleeting minutes chimping at your LCD – trust these settings and adjust only if the towers appear as dark silhouettes.
How to edit your photos like a NYC postcard pro
The bridge's steel cables often appear muddy in raw dawn shots, but these editing tricks used by Manhattan photography studios will make your images pop. Start by lowering highlights (-20) and increasing shadows (+30) to reveal hidden details in the suspension wires. Apply a subtle S-curve in your tone graph to boost contrast without losing the morning mist effect. The magic touch? A radial filter over the sunrise area with +10 clarity and +15 dehaze – this mimics how human eyes perceive the scene. For mobile editing, Snapseed's 'HDR Scape' filter at 30% strength works wonders. Save your final edit in both sRGB for social media and Adobe RGB for prints; the bridge's morning colors look dramatically different across devices. Local galleries recommend exporting at 300 DPI resolution to preserve the cables' intricate patterns when printed large format.
FAQ 2026
Do I need a special permit for drone photography at the Brooklyn Bridge in 2026?
Yes, all drone takeoffs and landings in New York City require an NYPD permit under the 38 RCNY § 24 administrative code. You must apply at least 30 days in advance and prove compliance with FAA Part 107 regulations.
Are there still bicycles on the Brooklyn Bridge pedestrian walkway in 2026?
No, the upper walkway is now exclusively for pedestrians and photographers. The bike lanes were permanently moved to the roadway level, making it much safer and easier to capture long exposures without vibration from passing cyclists.
Does New York's congestion pricing affect photographers driving to the bridge in 2026?
Yes, if you are driving into Manhattan below 60th Street to reach the bridge entrance, a daily toll (currently $9 for passenger vehicles) applies. To avoid this, many photographers now park on the Brooklyn/DUMBO side where the zone does not apply.
Written by New York Tours Editorial Team & Licensed Local Experts.
Last updated: 24/02/26